About Me

My photo
This blog is for the purpose of all things related to the kitchen. This includes recipes, cool gadgets, and little anecdotes. Enjoy!

Wednesday, May 11, 2011

"Ma, The Meatloaf"

To me meatloaf was always one of those gross school lunches, which they slopped onto your plate and forced you to eat the "mystery meat" of the day. It is known for being dry, crumbly, and bland...basically nothing special. Recently, when I was home on vacation my mother served a new meatloaf recipe which managed to change my perception on this dish.

Her meatloaf could not be described as dry, bland, or crumbly. It was as if meatloaf received a complete head to toe makeover! Instead of a just a hunk of meat, this dish has vegetables in its center. I made this recipe with sauted mushrooms and onions, but you can also do it with spinach or any other vegetable of your choice. Needless to say, there was not a piece left by the end of the meal. I am convinced this is one of those recipes that no matter how much you make, there will never be leftovers.

Meatloaf

3 lbs of ground meat (or you can mix half meat half turkey)
1/2 cup brown sugar
1/4 cup ketchup
3 tablespoons red wine vinegar
mushrooms
onions

1. spice the meat with some garlic powder, onion powder, 2 eggs, ketchup
2. mix together the brown sugar, ketchup and vinegar.
3. saute the mushrooms and onions in a pan
4. take half the meat and place it in a pan or on a baking sheet in loaf form
5. place the mushrooms and onions on top of the loaf
6. pour on half the sauce
7. use the rest of the meat to make another loaf on top of the first
8. pour the remaining sauce on top of the loaf
9. bake at 350 degrees until brown, about an hour

Enjoy!

Sunday, May 1, 2011

Another Post From My Dear Sister


It is a well known fact that onions have layers. I have always thought that my older sister, Tali, was one of the most complex people I know. After having not lived with her in the same house now for five years, every time we do reunite I always discover new things about her. She is one of those people who has a lot of depth and really cares about other people. I know that there is always another "layer" to peel away and an opportunity to learn something new from her. After all, Tali is always right...That is why I think it is so fitting that she chose to share a stuffed onion recipe. 


Dear All,

Today marks a day in history…a time when events are happening in the world. 94 year old Zsa Zsa Gabor is trying to have a baby, Jeopardy’s Trebek asked what the backyard BBQ compound with the molecular formula C3H8 is called and a contestant answered “coal,” Congress has just passed the new budget bill, and I am writing my second blog post.

At this point, I’m thinking “hey, I should just start a blog of my own.” The problem is that once I start one blog, I’ll end up having to create numerous blogs in order to fully share with my readers the true life of Tali Bauman aka The Craziness of Me.

So for now, I’ll just stick to guest posting on Shira’s blog (thanks for your kindness, dear sister).

Tonight, I decided to make stuffed onions. Why? Because I thought I would be having only a few guests over for Shabbat lunch, wanted to have another ‘meat’ dish in addition to chicken cutlets (no, deli roll is not an option and is clearly a fallback for people who just want to eat filo dough), and  I figured, heck, how hard can it be to stuff some onions. Well, turns out, my meal grew to 8 and oh hey, it took me an hour and a half to stuff those onions (I’ll be honest- I did 4 loads of laundry in the middle).  

And with that exhilarating introduction, here’s how I did it. (I would like to acknowledge SmittenKitchen for the original recipe and my mom for the "doctoring up the meat" recipe) 

Buy various onions (medium sized, red, yellow, sweet)
SUGGESTION #1: I found the red onions to be easier to scoop out than the yellow onions

Cut each end of the onion (about a ½ in.) and make sure that the onion can stand on one side

Using a knife and spoon (the utensil teamwork really helps), scoop out the center of the onion leaving 2-3 layers on the outside
SUGGESTION #2: Requires a lot of upper body strength and patience. Don’t get frustrated if the onion starts to break a little or if there is a hole at the other end; it will be okay.

Place onions standing upright in 9 x 13 in pan and add ½-1 cup of water at the bottom and cover with aluminum (tin/silver- do they really make silver??) foil


Place in oven at 425 oF for 25-30 minutes until the onions are cooked but not too soft

In the mean time, chop the centers of the scooped out onions and cut up a red pepper


Sautee until brown, add some salt, pepper, and 3 garlic cloves (~1.5 tsp of minced garlic)

Add ground beef to the pan and allow to brown

Stir in 2 tbls of sugar, 1 small can of tomato sauce, and some ketchup and cook for a little longer on low flame

When you are sure the meat is cooked, add some chopped almonds


Scoop meat filling into the onions


Place back in the oven at 325 oF for another 25 minutes (keep an eye that the meat does not start to burn)


Your guests will love this fancy treat. Let me know if you can beat my 1.5 hr time- should not be too difficult.

Enjoy!

Thursday, April 14, 2011

And All God Said Was Don't Eat Bread!


In my family, Passover is always a big production. We have 25 guests relatives from out of town move into our house for 3 days. The food is never ending, and with my family there is never a dull quiet moment. Every year the same stories are retold, yet they never seem to get old. The same arguments and words are said at the Passover seder, and yet everyone still loves to hear them.

My mother cooks her heart out for this holiday. It is rare that we see her leave the kitchen. And after every meal everyone expresses how full they are and how they cannot fit another bite into their already bloated stomachs...yet a few hours later they are asking about the next meal.

Most would assume with all the dietary restrictions placed on us for these seven days it would be difficult to eat good food. On the contrary, we all say certain foods always come out so much better on Passover. We cannot explain it since the recipes are the same year round, and yet for some reason we all agree it tastes much better this time.

One of these foods is potato kugel. I make potato year round, it's my go to kugel for shabbat. Don't get me wrong, I am very proud of my potato kugel. I like to think of it as delicious. Nevertheless, I still know that when Passover comes around...all my potato kugels will be put to shame by this one. The most important trick I learned from my mother is to make sure to heat up the oil before pouring it into the mix. So I always put the oil in the pan first and put that in the oven for 15 minutes or so and add that in last, right before placing the whole kugel in the oven. I find it helps to really give the kugel a great golden brown look.

I will place a warning attached with this recipe. It seems to run in my family that we all have our faux pas with potato kugel. My mother has yet to live down this story and it is from before she was even married to my father. She was preparing a potato kugel for shabbat and made sure to add pepper to the kugel since she knew my father liked it. The kugel turned out to be inedible because of the copious amounts of pepper.

I too messed up one of my first potato kugels, however to the opposite extreme. I made it one shabbat and forgot to add any sort of pepper or salt. Needless to say, it was a very bland mixture of potatoes.

So I remind you to check the recipe twice before putting it in the oven!

Potato Kugel

1/2 C. oil
8 medium potatoes
2 onions chopped
1 tablespoon salt
Black pepper
2 1/2 tablespoons flour
5 eggs

Heat oil in 9 x 13 pan in oven. Peel and grate potatoes and onions. Mix in
rest of ingredients. Add hot oil and mix. Pour into pan and bake at 400 F
for about and hour or until brown on top.

Enjoy!

Happy Passover!

Friday, April 8, 2011

The Salty-Sweet Combo


I have always been a fan of the salty with the sweet. In my mind, whoever thought to mix the two was a genius. I will eat chocolate covered pretzels, caramel popcorn, tortilla chips with sweet chili....I like it all.

Recently, I came up with a new salty-sweet combination without even realizing what I was doing. As I was preparing my dinner of a greek salad I decided to change things up a little and really live on the edge. Instead of using my normal dressing of olive oil, salt, pepper, and oregano I was in the mood for poppyseed dressing. This dressing is more on the sweeter side and the combination of that with the salty feta cheese really excited my taste buds.

My new favorite thing to do with salad dressing is put all the ingredients in a mini food processor and blend it all together. This saves my poor arm from all the shaking and the high chance of a jar of oil exploding on me. The outcome is a great creamy dressing.

I highly recommend trying this combination, even though it sounds a bit strange!


Greek Salad

Romaine lettuce
tomato
cucumber
red onion
olives (optional)

Poppyseed Dressing

1 cup oil
1/3 cup vinegar
1/2 cup sugar
1/2 teaspoon mustard
2 teaspoons honey
2 teaspoons chopped onion
2 teaspoons poppyseeds


ENJOY!!


Wednesday, April 6, 2011

A Heart Attack Continuation


I have loved red meat ever since I tried ribs for the first time on my trip to Florida with my grandparents years ago. Growing up I never had the opportunity to eat it so frequently since my father is very good about not eating meat in order to stay healthy.


In my quest to learn how to make delicious meat and put my cholesterol through the roof, I decided to try my favorite meat of all...corned beef. Your first thought might be why does she like the corned beef cold cut that much?? Well, don't get me wrong thats delicious as well. But this cut of meat is the kind you buy at the butcher, it is normally a brisket which has been pickled. The beauty of corned beef is that you boil it before cooking, so it is always soft no matter what.

The way I make corned beef, as learned from my mother, is by boiling it in water for about 2-3 hours. I then let it cool and slice it nice and thin. I make a great glaze out of ketchup and mustard and poor that on top of the meat and bake it for 30-45 minutes in the oven.

What is great about this recipe is that you can freeze it at any stage so it can be prepared earlier to save time. When I make it, I often freeze it after boiling and only defrost it the day I want to serve it and then glaze it right before the meal.

I strongly believe if you don't try this recipe you are really missing out!


Corned Beef Glaze

1 cup brown sugar
1/2 cup ketchup
3 tablespoons vinegar
2 tablespoons oil
2 tablespoons mustard 

heat all ingredients together in a sauce pan on a low flame and poor onto already sliced corned beef. Bake at 350 degrees for about 30-40 minutes, until sauce is sticky. 

Sunday, March 27, 2011

London Broil Falling Down

Follow my blog with bloglovin

The idea of cooking meat always scares me. I have always stayed away of any form of red meat that is not ground or minced. You never want to be the one who serves the rubbery chewy piece of meat to your guests. Recently, I have taken the bull by the horns (no pun intended) and decided I was going to learn to cook meat.

The whole process just placed stumbling block after hurdle trying to trip me up. Firstly, I had to go to the butcher and pick out the correct cut of meat. They have this whole diagram with numbers correlating to different parts of the cow, similar to this picture (only much more complicated in real life): 

File:Beef cuts.svg

After staring at this diagram for eternity, it still did not help me chose the right cut of meat. Do I want rib, brisket, top sirloin, bottom sirloin? With my head's looming implosion, I quickly called my mother. Five minutes later and I find myself walking out of the butcher with a nice big shoulder london broil. 

Now what to do next? If picking out the meat wasn't tough enough, the idea of turning it into a perfect dish seemed even more impossible. Once again my mother came to the rescue with suggestions and specific instructions of how not to mess this up. 

After doing extensive research, the next logical step pointed to marinading the meat overnight to make it as soft and juicy as possible. As per my mother's instructions I threw together some oil, soy sauce, honey, rosemary, and garlic and let the meat marinade in a bag over night. The transformation of it the next morning was a sure sign I was headed in the right direction. It was darker, having soaked up all the juices, and definitely looked ready to cook. 


I placed it in a pan and put it into the oven at 220 degrees Celsius for 7 minutes on each side to brown. Next, in order to preserve the savory juices, I added a little water to the bottom of the pan and covered the meat with tin foil. I reset the oven to 150 Celsius and let the meat cook for 45 minutes until the juices ran clear. The key was to make sure that it was still a little pink on the inside so that it wouldn't dry out. Once cooled, slice it (against the grain). Overall, I'd say my first attempt was a good one, especially since none was left. 


London Broil

3-4 lb london broil 
1/2 cup oil
1/2 cup soy sauce
1/4 cup honey
3 tablespoons rosemary
6 cloves garlic, minced
salt and pepper

1. Combine all ingredients and let marinade in a bag overnight
2. Cook at 220 Celsius uncovered for 15 minutes browning each side
3. Cover and cook for 45 minutes until juices run clear at 150 Celsius
4. Cool and slice
5. Reheat to serve

Enjoy!

Wednesday, March 23, 2011

How Do You Like Your Cabbage?

....SLAW SLAW SLAW!

I love salads. My ideal meal is one or two main dishes and a lot of different interesting salads on the side. One thing I have learned in Israel is that they don't understand the idea behind a big leafy salad. Whenever I make my own salad in university and ask for lettuce I always end up with a couple of sad looking pieces and them standing there waiting to hear how I want to fill the rest of my salad with cucumbers, tomatoes, and chickpeas. Needless to say, I get funny looks when I ask for more lettuce.

Living on my own has also proven a challenge to my salad making. Whenever I opt for the healthy choice and decide to make myself a salad, all I ever seem to find in my fridge is old wilted lettuce and mushy tomatoes. For some reason in my mind the next logical move is to pick up my phone and dial the pizza store (ignoring the fact I have a produce store around the corner which is open at all hours of the day!)Before you know it, a pizza is delivered to my house, so obviously I'm have to eat it. I just still can't figure out how that happens....so much for being healthy.

All that being said, that is one of the biggest reasons I like this cabbage salad. I can buy a couple bags of already chopped cabbage and they last me much longer than lettuce. The ingredients are so simple and I can put together this salad before my hands have a chance to reach for the phone. Being a student, I have adapted this recipe to fit the contents of my kitchen, so the measurements aren't so exact. Even if it tastes a little different every time I make it, it is always delicious.


Cabbage and Ramen Noodles Salad

1 package of chopped cabbage
1 package of instant ramen noodles
1 cup of olive oil
1/2 cup of sugar
2 teaspoons of soy sauce
 1/2 teaspoon of vinegar

1. put the cabbage in a bowl and sprinkle the raw noodles on top. 
2. combine the dressing (possibly adding more sugar or soy sauce depending on your preference)
3. mix all together

Enjoy!


Thursday, March 17, 2011

On Top of Spaghetti all Covered in Sauce I Lost My Poor Meatball When Somebody Caughed

Meatballs has always been a specialty of my mothers. She somehow is able to take dry, plain ground turkey and make is deliciously sweet and savory. In my family we try to cook with turkey or chicken instead of red meat for health reasons. So when I took on the challenge of meatballs a while back I was nervous they wouldn't measure up to my mothers. The problem I have with this meal is that it is a lot of guess work. I can never seem to get a straight answer when asking for exact cups and tablespoons. Therefore, I have never reached that ultimate "these taste just like my mom's!"

However, there was one time earlier this year that I tasted that sweet victory. I decided after an extremely long and tiring day that I was going to make meatballs and spaghetti for dinner. My roommates have spoken about "THE MEATBALLS" every since. Anytime I mention ground turkey it always evokes the memory of those fresh, perfectly round, tomatoey yet sweet, meatballs. It has almost become something of a myth now, never being able to reach perfection like that since. I still ponder whether it really was something in the recipe that day, or just our extreme hunger. But even if it was only for that one meal, I lived up to my mother's famous meatballs.


Sweet n' Sour Meatballs 
1/2 kilo ground turkey
1/2 kilo ground chicken
2 cans  crushed tomatoes
1 jar of apricot jam
brown sugar

1. Mix together the turkey and chicken. Add one egg, ketchup, paprika, garlic, salt, and pepper to season the meat.
2. Combine tomato sauce and apricot jam in a pot and bring to a boil. You can dilute it with water if it needs thinning. Add brown sugar to sweeten the sauce to your liking.
3. Roll the meat into small balls and drop into the boiling sauce.
4. Leave them on a low flame for about 45 minutes, or until cooked.

These are great to serve with spaghetti or rice.

Enjoy!

Wednesday, March 9, 2011

Tali Knows Best

For all those who don’t know me, I come from a family of four girls. One of life's
biggest challenges (and blessings) has been that my older sister and I are separated by
only 15 months! To tell you that it was like growing up with a best friend always around, running and skipping through the dandelion covered fields, sharing one ice cream cone with two scoops and finger painting each other’s rooms would be…false. We used to fight about everything: clothes, the television, Barbies, who gets the car…basically anything! Despite our continuation of this petty game for years, we grew up (and out of the house) and came to appreciate what makes the other one so unique. What has always made my sister Tali special, has not been her cooking abilities. This is particularly awesome since I love receiving those phone calls or bbm's where she needs my help with a recipe. What younger sister doesn't love being right?!
More recently though, since Tali has become quite an adequate chef in the kitchen, I felt it was time for her to share one of her favorite recipes. But even though she is improving daily, I still must remind her of her humble beginnings, like the time she forgot to put the top on the blender and batter went flying ten feet in the air! But for the time being, here's to Tali and her struggle to domestication!


For those of you who know me as Shira's cool, fun, mature sister, you also know how domestically challenged I am. Following a protocol in the neuropathology lab I work in or throwing a bunch of clothing items together to create a fashionable outfit is not too difficult for me. But upon entering the kitchen (gasp!), the burns on my arms, half food dishes spilled on the floor, and smoke alarm ringing throughout my apartment (yes, was a highlight of my week when 3 firemen visited my apartment at 12 am on a Thursday night to check the carbon monoxide detector while I was cooking for Shabbat) reflect my performance ability to cook. 

As I have entered adulthood and gained intellectual independence, I have come to several realizations:
1. If I do not cook for myself, I will be hungry
2. If I do not cook for myself and do not want to be hungry, I will eat out at restaurants for every meal
3. If I order food from NYC eating establishments for lunch and dinner in addition to my daily cup of coffee, I may become poor
4. If I become poor, I cannot shop at Anthropologie and Lord and Taylor anymore (and if you ask any of the Bauman girls, clothes trump food)

Like in other aspects of life, hard work, determination, and practice prove to refine and hone techniques and skills. Therefore, I have started teaching myself how to cook. It has a been a wonderful learning experience as I journey through the world of recipes, late night chats with my oven, and spiritual kitchen clean ups. One highlight was cooking dinner for 14 people and hearing them rave about my lemon curry chicken cutlets, hickory smoked chicken cutlets with sauteed onions, and beef-barley-leek soup. That same weekend, I created a new salad recipe based on a salad I ate at Cafe Rimon in Mamilla (for all you Israelis reading this- you can pay 59 shek for it) or you can just follow this awesome recipe. Enjoy!


Quinoa Salad

Black or red quinoa (2-4 cups depending on how big you want the salad to be)

Arugula

Granola

Craisins

Balsamic dressing 


Dressing: (courtesy of Eliana Bauman)

1/4 to 1/2 cup of sugar (I like it sweeter, so I use 1/2 cup)
1/2 cup of oil
1/4 cup balsamic vinegar
1 tablespoon of soy sauce

This post is dedicated to Ilan Tokayer; cooking was only one of his many passions in life.

Tuesday, March 8, 2011

A Sandwich I Approve Of

Anyone who knows me, knows that growing up I absolutely hated sandwiches. I was never the child who brought their peanut butter and jelly sandwich with the crust cut off to school everyday, for 12 years. Instead I was stuck with my noodles and ketchup or bag of pretzels. Then I was introduced to this kind of sandwich...one with fresh bread, meat, and onions. This is no ordinary deli sandwich, this is much better. So in honor of my growing up and maturing...here is a sandwich I eat!


1/2 lb of salami
2 onions
BBQ sauce
rolls
condiments for a sandwich

1. Cut up salami into chunks(you can also use hot dogs if you don't have salami).
2. Slice the onions into rings
3. Let the salami and onions marinate in BBQ sauce for 20 min.
4. With a little (very little) oil, saute the onions and meat together in a pan, you can add more BBQ sauce for flavor.
5. Saute until golden brown (about 15 minutes)
6. Add to a lightly toasted roll 
7. Add any vegetables or sauces you like.

Enjoy!

Saturday, March 5, 2011

Guest Blog Post by the Master Chef....Brian Koenigson

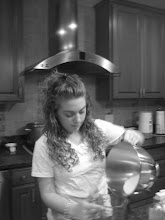
Hey guys, my name is Brian Koenigson and I’ll be your narrator this evening. I am currently enrolled in the Culinary Arts and Hotel, Restaurant and Institution Management program at Middlesex County College in Edison, New Jersey. Today I’d like to talk about my Thursdays. In school, on this truly glorious day of the week (one day after hump day!), I have a six and a half hour class called Quantities Food Service. It is in this class that I am taught how to cook fifty portions of a five-course meal that the cafeteria sells to the general public as an upscale alternative to the lunches they normally serve.
Every time we serve a meal, the professor (a former executive chef of the premier establishment, Tao in Las Vegas) chooses two people to be the production manager (who are in charge of making things run smoothly and efficiently as well as making sure all the different components of the meal are completed in time for service) and a sanitation manager (who are in charge of cleanliness in the kitchen and making sure all safety and health regulations are followed to a tee). Today, finally, it was my turn to be production manager. I’ll give you a rundown of the menu.
Fresh, out-of-the-oven Focaccia bread with a Tomato, Basil and Vinaigrette salad on top
A Broccoli and Cheddar Cheese Soup
Baked Italian Salad of Tomatoes, Zucchini and Mozzarella
Homemade Lasagna with Ground Beef, Fresh Marinara Sauce, Ricotta Cheese and       Mozzarella
Olive Oil and Coconut Brownies
 After all the recipes have been handed out and the various ingredients checked in, it’s time to start. My teams’ objective was to finish making the fresh marinara sauce by the time the lasagna noodles are cooked perfectly al dente. All the members of the class are at different points in their professional cooking careers and sometimes it is difficult to work with members who aren’t as experienced as you. I didn’t know making a simple marinara sauce could be so difficult to make with three people. I guess the saying is true, ‘Too many chefs spoil the soup.’ There is no doubt in my mind that if one person had been making the sauce it would have been done sooner and more efficiently. Not to say that it was not done on time or tasted poorly, in fact it was quite the opposite but sometimes if you want something to be done right you just need to do it yourself.
The only major nuisances we had all day came from the baking team. One mistake (of many) was measuring the amount of flour needed for the recipe completely wrong and after wasting time mixing it with water and yeast they realized what they had done. All the bread that was made for that day’s meal was finished within minutes of service time and the students working the station were driving the professor crazy. However, everything else in the kitchen seemed to run rather smoothly. Everything was finished in time and all the components to each dish came together right before the cafeteria opened. After all the food was labeled and sent up to be sold, the class cleaned the kitchen and all the dishes we had used that day. Our professor went up stairs to be the spokes-person for our meal in the cafeteria, getting the word out that certain meals had been made by the schools very own culinary program students.
            Our meals at the cafeteria had sold out and the day deemed a success. I was happy with the products we were able to put out and we received only compliments. Now I have to wait until next week when I’ll be a lowly cook and some other student will be running the show.
Thanks for your time and keep it real.
--Brian.

Brian's Famous Carrot Basil Soup
1 onion
3 carrots
1 potato
1 chili pepper
5 cups of chicken stock
2 cups of water
chopped basil
1 bay leaf
pinch of nutmeg
juice of lemon
50 ml cream or non-dairy creamer
salt and pepper

1. Cut all the vegetables medium diced.
2. Saute the onions until golden, then add the carrots and sweat them off for a few minutes.
3. Add the potato, salt, pepper, and chili pepper (like you would find in a pizza store). 
4. Stir in chicken stock, water, basil, and bay leaf.
5. Bring it all to a simmer, and let it cook until the vegetables are tender. 
6. Add the cream or non-dairy creamer and the nutmeg.
7. Using an immersion blender, blend thoroughly until smooth. 
8. When ready to serve, put into bowls and squeeze some lemon juice over the top of each serving and garnish with a few roasted pine nuts. 

photo 4.jpg

Wednesday, March 2, 2011

Edamame Salad

Edamame is a soybean in a pod, sounds strange I know, but I myself have become quite the fan of this pod. I was really only introduced to this vegetable this year, and have really learned to love it. I buy them frozen and if you cook them in the microwave and just sprinkle some salt and lemon juice on them they are a great side dish to any meal.

Another way to try them is by shelling them (or if you are lucky enough to find already shelled ones) and adding them to a salad. This is a very easy and colorful salad which is a great addition to any meal.

Edamame Salad

1 bag of edamame beans
1 can of corn
2 peppers
1 red onion

Chop the peppers and onion very thin. Combine with the beans and corn. Add olive oil, vinegar, salt & pepper to taste. 


Enjoy!


Monday, February 28, 2011

A Little Taste of Heaven


To start things off on the right foot, I decided to post the recipe for what I grew up calling Muddy Buddies but others know it better as Puppy Chow. Regardless of its unique name, if you have ever tasted this snack, you know how delicious and satisfying it can be. In high school, it was one of my go to things to make, only under the condition that I took it out of the house so that my mother didn't eat the whole bag. Needless to say, my friends sure appreciated that rule!

This recipe is quick, easy, and takes a standard cereal and makes is delicious:

1 box of chex or crispix
1 cup of semisweet chocolate chips
1/2 cup of peanut butter
1/4 cup of margarine
1 teaspoon vanilla 
1 1/2 cups of powered sugar


  1. Into large bowl, measure cereal; set aside.
  2. In 1-quart microwavable bowl, microwave chocolate chips, peanut butter and butter uncovered on High 1 minute; stir. Microwave about 30 seconds longer or until mixture can be stirred smooth. Stir in vanilla. Pour mixture over cereal, stirring until evenly coated. Pour into 2-gallon resealable food-storage plastic bag.
  3. Add powdered sugar. Seal bag; shake until well coated. Spread on waxed paper to cool. Store in airtight container in freezer.
It is also interesting to see on the wikipedia page just how many names this piece of heaven has: 

ENJOY!

Welcome!

For a school assignment I was told to start a blog about anything, but choosing anything can be more difficult than it seems. Then clarity struck and the only logical answer was to blog about cooking! My plan is to post the things I cook and bake as well as the recipes. I hope these recipes will help when it comes to planning your meals.

Shira